Getting Started
First, let’s try to get an overview of the workflow and the most important functions:

The idea of the user interface is to pull-in information from your documents (right sidebar) and to combine it with declarative “blocks” from the left sidebar.
The FAIR DO Designer uses a visual way to express the design of records using blocks, similar to programming-learning tools like “Scratch” or other visual programming tools. Only well-connected blocks will be used in the design. Other blocks will be visibly ignored until properly connected. The visual difference is shown in the following figure:
To delete a block, click on it to select it, then press the delete key on your keyboard. Alternatively, you can drag it to the trash bin on the bottom right of the canvas. It has the same effect. You can restore deleted blocks by clicking on the trash bin. Undo and Redo functionality is also available using CTRL+Z and CTRL+Shift+Z, where CTRL may need to be replaced with CMD or ALT, depending on your system.
We recommend reading further in this guide. In case you like to experiment with existing examples in parallel, consider this list:
- open “Basic design example” in the FAIR DO Designer
- (more examples are planned)
Step 1: Add your representative (meta-)data files
Those files should contain at least the information you’d like to add to your record. It is okay if not every file will later have every piece of information.
Only the attributes your profile (more on that later) defines as mandatory, must be present. If it happens that a document will be incomplete in this sense, the request to register will (by default) not register any record to ensure incomplete connections.
The sidebar on the right summarizes all your JSON files. You can add as many as you like. The sidebar will show you how often an attribute is contained to give you an overview. Clicking on an attribute or dragging it to the canvas will create a new block for it to connect. A more detailed manual about the right sidebar is available.
If you do not have any files at hand, you can click “Add example files” in the sidebar to add some example documents. Try to add a block for the “sampleID” attribute to the canvas.
Looking at the “Read” block, you’ll notice a small search icon. Clicking it will show you the origin of the block in the sidebar on the right.
Step 2: Add a record and a profile
A design can create one or multiple records from a single file. It depends on the amount of record blocks being added. They look like this:
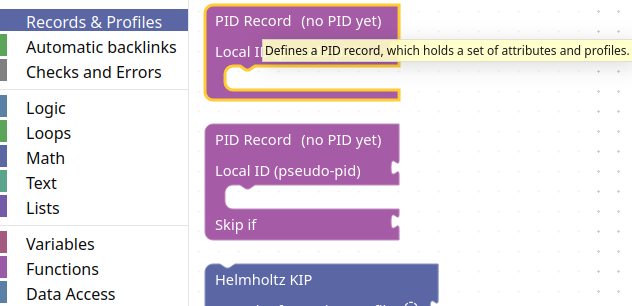
Records need to get filled with profiles or single / additional attributes. The following figure shows their blocks:
Records and profiles (and additional attributes) can be combined like shown in the following figure. A profile may or may not allow adding further profiles and attributes at the bottom.
Find a record and a profile block in the category with the same name in the left sidebar. Drag them on the canvas, then plug them together as in the figure above.
Step 3: Connect all required fields
The usual procedure to add required fields is to extract them from your documents:
-
Drag an attribute from the right sidebar into the canvas. Alternatively, you can simply click on it. In both cases, a new “Read” block will appear on the canvas. Such a block represents this attribute in any document.
NoteTechnically, the block represents a JSON-Path to the attribute in an arbitrary document. The path can be viewed and modified by doing a right-click on the block. See Data Access for details.
-
Connect the attribute directly to an attribute. If the value is not in the correct format or needs other pre-processing, you can use the block from the left sidebar to create a processing chain. For more complex transformations, take a look at the Transformations Guide.
If your data is missing some basic information, like the license of your data, you can add such information as a string block and provide it to your record:
- In the left sidebar, open the “Text” category and click or drag a text block onto the canvas.
Attach the field to the license attribute in the profile and insert a value into its text field, like this:
Loading...
Step 4: Find an identifier for your record
Did you notice there is an “ID” input at the record block? In theory, this input is not required. But in order to connect FAIR DOs later, we need at least some pseudo-PID for our records.
-
Find an appropriate identifier in your metadata (in the right sidebar) and drag the block on the canvas.
If there is no unique identifier in your metadata, you can create one using other pieces of information. For example by combining a creation date, a title, and a creating person or machine. You can find blocks to calculate and combine information in the left sidebar. All tricks learned in Step 3 are valid, except for constant blocks.
NoteThe ID must be unique to your FAIR DO! Therefore, the ID must depend on your input documents. A constant ID will never make sense, as all your FAIR DOs then can’t be distinguished!
-
Attach your identifier to the “ID” input.
In a simple, ideal case, it could look like this:
Step 5 (optional): Add optional attributes
Each profile block has a drop-down menu at the bottom. It allows you to add further optional attributes. While you do not need to add such attributes, it is recommended to at least state all connections to other objects, as well as information which will be useful for selecting data for certain tasks. Except from that they can be deleted, they work the same as required fields (see Step 3).
Step 6: Save your design
Your work will be automatically saved in the local storage of your browser. While this can be convenient, it is not a permanent storage. You can save your work to a file using the menu at the top.
Before you save, consider giving your design a proper name. You can do this using the title left to the menu bar (see the overview image at the top of this document).
Step 7: Export the design as python code
When you finished your design, you’ll want to run it either on the same or on similar files.
-
Download the generated python project.
At the right sidebar, there is a tab called “Generated Code”. From there, you can view the code which represents your design. To retrieve the full python project, click the download button in this tab.
-
Unzip the downloaded file.
-
Read the README.md file.
It contains all instructions you need to run the code or adjust it.